
e-Verification of ITR: A Step-By-Step Guide on How to e-Verify the Income Tax Return
- Rajesh Kumar Kar

- May 14, 2025
- 14 min read

When the Indian Government started with the transformation journey of India to ‘Digital India’, it aimed to provide its citizens with a robust online infrastructure. Moreover, the Government intends to make Indian citizens more digitally advanced and provide them with online facilities to ease their work. One such advancement can be seen in the services provided by the Income Tax Department.
The Income Tax Department has made numerous changes in the manner it operates and enforces the Income Tax Law on the Indian citizens. To be more specific, the Income Tax Return filing process and its aftermath has undergone significant changes.
This article targets the e-Verification process of the Income Tax Return, explaining each step and process in a detailed manner.
Table of Contents
What is e-Verification of the Income Tax Return (ITR)?
While filing the ITR, an assessee has to confirm/validate the declaration mentioned in the ITR. The declaration is simply a confirmation obtained by the Income Tax Department that the information submitted in the return is true to the best of the knowledge of the assessee.
An e-Verification is a process that streamlines the manner of validating the ITR and ensuring its accuracy and authenticity. Moreover, it replaces the traditional method of validating the Income Tax Return Verification Form (ITR-V), which required the assessee to physically sign and send the ITR acknowledgement at the Income Tax Department’s Centralised Processing Centre (CPC) in Bengaluru.
Importance of Verification of the Income Tax Return (ITR)?
Verification or providing validation to the ITR is very important. Failure to do so within a stipulated time will make the ITR invalid. If the assessee fails to verify the ITR within a given timeframe, the ITR will not be considered as filed or it is treated as an invalid filing. Moreover, the ITR will not be processed by the Income Tax Department, that is, no action will be taken by the department till the ITR is verified by the assessee. The Income Tax Department may serve a notice to the assessee for failure to e-Verify the ITR.
Note: It is pertinent to remember that, w.e.f. 1 August 2022, the ITR should be verified within 30 days of filing.
Steps for e-Verification of the Income Tax Return (ITR)
The ITR can be e-Verified either by logging in to the Income Tax portal or without logging in thereon.
1. Following are the steps for e-Verification of the ITR without logging into the Income Tax portal:
Step 1:
Visit the Income Tax e-filing website at https://www.incometax.gov.in/iec/foportal/

Step 2:
Select the e-Verify Return option under Quick Links.

Step 3:
Enter the required information like PAN, Assessment Year, Acknowledgement Number, and the Mobile Number.

Step 4:
Enter the OTP received on the mobile number provided earlier.

Step 5:
Click on the Submit option.

Step 6:
Successfully complete the e-Verification.
2. The steps for e-Verification of the ITR by logging into the Income Tax portal are as follows:
Step 1:
Login using your credentials to the Income Tax portal at https://eportal.incometax.gov.in/iec/foservices/#/login
Step 2:
Select the e-file option.

Step 3:
Under the e-file option, select Income Tax Returns.

Step 4:
Under the Income Tax Returns option, select e-Verify Return.

Step 5:
Select the method of e-Verification.

Step 6:
Successfully complete the e-Verification.
It is pertinent to note that the returns pending for e-Verification will only be displayed under the e-Verification tab and not otherwise. Moreover, the acknowledgement number of the ITR filed will be required to proceed with the e-Verification.
Different Options for Verification of the Income Tax Return (ITR)
At the time of submitting the ITR, an assessee is provided with various options for verifying the ITR. An assessee can avail any of the following options to verify the ITR on the Income Tax portal:
1. e-Verify Now:
If an assessee wants to complete the e-Verification process immediately, this option can be selected. Under this option, e-Verification can be done instantly through Aadhaar OTP or prevalidated bank or demat account of the assessee.
2. e-Verify Later:
The assessee may choose to file the ITR without verification. However, the verification of the ITR should be completed within 30 days from the date of filing of ITR.
Note: If the assessee chooses to e-Verify the ITR later, he cannot e-Verify the ITR using the Digital Signature Certificate (DSC).
3. Verify via ITR-V:
The assessee may opt to verify the ITR by physically signing the ITR-V Form and submitting it to CPC Bengaluru. The time limit of physical submission is the same as e-Verification, that is, 30 days.
Modes of e-Verification of the Income Tax Return (ITR)
An ITR can be e-Verified through any of the below modes:
Aadhaar OTP
Aadhaar OTP, already generated
Digital Signature Certificate (DSC)
Generating Electronic Verification Code (EVC) through:
Net Banking
Bank Account
Demat Account
Bank ATM
Electronic Verification Code (EVC), already generated
Step-By-Step Guide Explaining Modes of e-Verification of the Income Tax Return (ITR)
Each mode of e-Verification of the ITR is explained in detail below along with outlining the steps for e-Verification using different modes.
1. e-Verification using Aadhaar OTP
Step 1:
Login to the Income Tax portal with your credentials, at https://eportal.incometax.gov.in/iec/foservices/#/login. Select the e-file option, then Income Tax Returns, and finally click on e-Verify Return.
Step 2:
Select the option ‘I would like to verify using OTP on a mobile number registered with Aadhaar’, and then click continue.

Step 3:
Select the option ‘I agree to validate my Aadhaar Details’ and click on Generate Aadhaar OTP.

Step 4:
Enter the 6-digit OTP received on the mobile number registered with Aadhaar and proceed with Validation.

Important:
The Aadhaar OTP will remain valid for 15 minutes only.
The OTP should be entered correctly and only 3 attempts are given to enter the correct OTP.
Resend OTP option resends the OTP, if it is not received earlier.
Step 5:
Successfully complete the e-Verification process. Upon completion, a Transaction ID is displayed along with the success message. A simultaneous confirmation is received via email and message registered on the Income Tax portal.
2. e-Verification using Aadhaar OTP, already generated
Step 1:
Login to the Income Tax portal with your credentials, at https://eportal.incometax.gov.in/iec/foservices/#/login. Select the e-file option, then Income Tax Returns, and finally click on e-Verify Return.
Step 2:
Select the option ‘I already have an OTP on mobile number registered with Aadhaar’. Enter the OTP and then click continue.
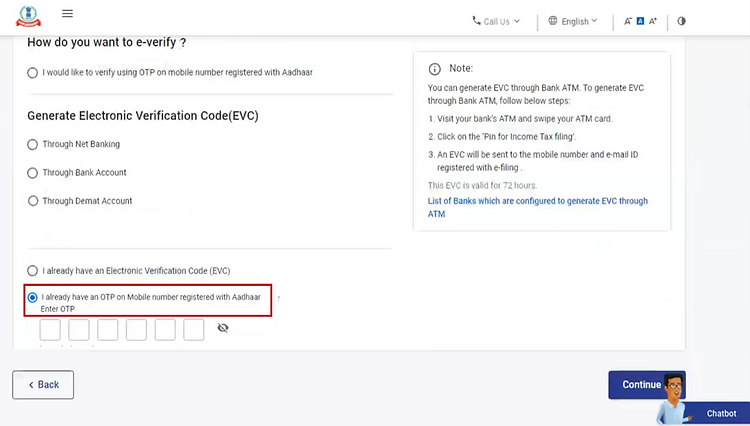
Important:
The Aadhaar OTP will remain valid for 15 minutes only.
The OTP should be entered correctly and only 3 attempts are given to enter the correct OTP.
Resend OTP option resends the OTP, if it is not received earlier.
Step 3:
Successfully complete the e-Verification process.
3. e-Verification using Digital Signature Certificate (DSC):
Step 1:
Login to the Income Tax portal with your credentials, at https://eportal.incometax.gov.in/iec/foservices/#/login. Select the e-file option, then Income Tax Returns, and finally click on e-Verify Return.
Step 2:
Select the option ‘I would like to verify using Digital Signature Certificate (DSC)’ and click continue.

Step 3:
Click on the link to download ‘emsigner utility’, if not downloaded and installed already. Otherwise, check mark on the option ‘I have downloaded and installed emsigner utility.

Step 4:
After the completion of download and installation of ‘emsigner utility’, select the option ‘I have downloaded and installed emsigner utility and click on continue.

Step 5:
Fill the information such as Provider, Certificate, and Provider Password on the Data Sign page and click on sign.

Step 6:
Successfully complete the e-Verification process.
4a. e-Verification using Electronic Verification Code (EVC) generated through Net Banking:
Step 1:
Login to the Income Tax portal with your credentials, at https://eportal.incometax.gov.in/iec/foservices/#/login. Select the e-file option, then Income Tax Returns, and finally click on e-Verify Return.
Step 2:
Select the option ‘Generate EVC through Net Banking’ and click continue.

Step 3:
Choose the Bank through which e-Verification is to be completed and click continue.

Step 4:
Go through the message in the Disclaimer and click on continue. You will be redirected to the net banking page of the selected bank.

Step 5:
Login to the bank account using the banking credentials.
Step 6:
On the bank’s website, select the option of e-filing. After which, you will be redirected to the Income Tax portal login and will be logged out from the bank’s website.
Step 7:
After logging into the Income Tax portal, you will be redirected to the e-filing dashboard. Select the e-file option, then Income Tax Returns, and finally click on e-Verify Return.

Step 8:
Successfully complete the e-Verification process.
4b. e-Verification using Electronic Verification Code (EVC) generated through Bank Account:
Step 1: Login to the Income Tax portal with your credentials, at https://eportal.incometax.gov.in/iec/foservices/#/login. Select the e-file option, then Income Tax Returns, and finally click on e-Verify Return.
Step 2:
Select the option ‘Generate EVC through Bank Account’ and click continue.

Note:
The EVC will be generated and sent to the registered mobile number and email id linked with the bank account and pre-validated on the Income Tax portal.
It is important to pre-validate the bank account and enable EVC on the bank account before proceeding with the verification process through EVC.
Step 3:
Enter the EVC received on the registered mobile number email id and click on e-Verify.

Step 4:
Successfully complete the e-Verification process.
4c. e-Verification using Electronic Verification Code (EVC) generated through Demat Account:
Step 1: Login to the Income Tax portal with your credentials, at https://eportal.incometax.gov.in/iec/foservices/#/login. Select the e-file option, then Income Tax Returns, and finally click on e-Verify Return.
Step 2: Select the option ‘Generate EVC through Demat Account’ and click continue.

Note:
The EVC will be generated and sent to the registered mobile number and email id linked with the demat account and pre-validated on the Income Tax portal.
It is important to pre-validate the demat account and enable EVC on the demat account before proceeding with the verification process through EVC.
Step 3: Enter the EVC received on the registered mobile number email id and click on e-Verify.

Step 4: Successfully complete the e-Verification process.
4d. e-Verification using Electronic Verification Code (EVC) generated through Bank ATM
Step 1:
Visit the nearest ATM of your Bank and swipe your ATM card in the machine. Only few banks provide the service of generation of EVC through ATM for e-Verification.
Step 2:
Enter the PIN details.
Step 3:
Select generate EVC for Income Tax filing.
Note:
The EVC will be generated and sent to the registered mobile number and email id linked with the bank account.
The PAN linked with the bank account should be the same for which e-Verification is to be made.
Following Banks allow generation of EVC through ATM: Axis Bank, Canara Bank, Central Bank of India, ICICI Bank, IDBI Bank, Kotak Mahindra Bank, and the State Bank of India.
The EVC received on the registered mobile number and email id will be used to e-Verify the return on the Income Tax portal
Step 4:
Login to the Income Tax portal with your credentials, at https://eportal.incometax.gov.in/iec/foservices/#/login. Select the e-file option, then Income Tax Returns, and finally click on e-Verify Return
Note:
The EVC will be generated and sent to the registered mobile number and email id linked with the bank account.
The PAN linked with the bank account should be the same for which e-Verification is to be made.
Following Banks allow generation of EVC through ATM: Axis Bank, Canara Bank, Central Bank of India, ICICI Bank, IDBI Bank, Kotak Mahindra Bank, and the State Bank of India.
The EVC received on the registered mobile number and email id will be used to e-Verify the return on the Income Tax portal
Step 5:
Select the option ‘I already have an Electronic Verification Code (EVC)’. Enter the EVC and then click continue.
Step 6:
Successfully complete the e-Verification process.
5. e-Verification using Electronic Verification Code (EVC), already generated
Step 1:
Login to the Income Tax portal with your credentials, at https://eportal.incometax.gov.in/iec/foservices/#/login. Select the e-file option, then Income Tax Returns, and finally click on e-Verify Return
Step 2:
Select the option ‘I already have an Electronic Verification Code (EVC)’. Enter the EVC and then click continue.

Step 3:
Successfully complete the e-Verification process.
Note:
When the e-Verification process is completed successfully, a Transaction ID and a success message are displayed on the screen. The assessee receives a simultaneous confirmation via email and message registered with the Income Tax.
FAQ
Q1. Why does an ITR need to be verified? Or What if an ITR is not verified?
The ITR filing process is considered to be completed only upon the completion of the verification process and not otherwise. Hence, if the verification process is not completed within the stipulated time, ITR is not considered as filed or treated as an invalid ITR.
Q2. Is it necessary to send the physical copy of ITR-V to CPC Bengaluru even if the return is e-Verified on the Income Tax portal?
The ITR verification can be done online or offline. Using online mode, indicates that the assessee is performing the e-Verification through the Income Tax portal. In the offline mode, a physically signed ITR-V is sent to the CPC, Bengaluru of the Income Tax Department. As a result, one of the two methods can be chosen for verification, not both.
Q3. What are the various ways for e-Verification of ITR?
The ITR can be e-Verified by any of the following ways: Aadhaar OTP with the registered mobile number, Digital Signature Certificate (DSC), Electronic Verification Code (EVC) generated through Bank Account, Demat Account, Bank ATM, and Net Banking.
Q4. What is the Income Tax Return Verification (ITR-V) form?
The ITR-V form is a one-page verification document that must be submitted to the Income Tax Department by the assessee, if he chooses to verify the ITR using ITR-V. The assessee must sign this form along with filling up all the requisite information according to the instructions on the form.
Q5. Can the Income Tax Department reject the ITR-V form? What are the further steps to be taken by the assessee?
The Income Tax Department can reject the ITR-V form due to various reasons. The reason for rejecting the said form is to be provided by the Department to the assessee. The assessee can refer to the reason for rejection and re-submit the form to the Department.
Q6. Is e-Verification more beneficial than the ITR-V form verification?
Yes. When the verification is performed electronically, it is completed immediately. The transit time of sending the ITR-V form physically to the CPC, Bengaluru is saved. Moreover, multiple options are provided to the assessee if he chooses for e-Verification.
Q7. What if the ITR verification is not completed within 30 days of filing the ITR?
If the assessee misses the verification deadline, he can submit a ‘condonation of delay’ request to the Income Tax Department, explaining the reason for the delay. Only after the Department approves the condonation of delay request, the assessee can proceed with the verification step and complete the same.
Q8. A notification is received from CPC, Bengaluru for non-receipt of ITR-V form despite sending the physical copy on time. What are the further steps to be taken by the assessee if the time limit of 30 days has lapsed?
The assessee should submit a condonation of delay request to the Department along with the reason for delay. Moreover, the assessee may re-submit the form or may opt for online e-Verification.
Q9. How can an assessee come to know about the completion of the verification process?
Once the verification process is complete, the assessee receives a confirmation email and a message from the Income Tax Department. Moreover, if the assessee performs the verification through the Income Tax portal, a transaction ID is displayed on the screen along with the success message on the screen.
Q10. Can an ITR be e-Verified by any person other than the assessee?
Yes. The ITR can be e-Verified by any person other than the assessee himself provided the other person is an authorized signatory or a representative assessee. However, the e-Verification in such cases can be performed through Aadhaar OTP, Electronic Verification Code (EVC) generated through Bank Account, Demat Account, and Net Banking.
Q11. If the mobile number registered with the Income Tax is not linked with the Aadhaar, can an e-Verification be still performed using Aadhaar OTP?
Only an Aadhaar-linked mobile number is eligible for performing ITR e-Verification.
Q12. Can an inactive demat account or bank account be used for ITR e-Verification?
The ITR e-Verification can be done only with the active demat or bank account. Hence, before performing the ITR verification using demat or bank account, both should be in an active state.
Q13. What is the meaning of Electronic Verification Code (EVC)? For how long it is valid?
An Electronic Verification Code (EVC) is a 10 digit code in an alpha-numeric form. When a request is raised to generate an EVC, the code is sent on the registered email id and mobile number of the assessee. The EVC remains valid for 72 hours from the time when it is generated.
Q14. Can an ITR be e-Verified without logging into the Income Tax portal?
Yes. The ITR can be e-Verified without logging into the portal by visiting the Quick Links option on the e-filing website of the Income Tax. The assessee will be required to provide the details of ITR filed along with the details of PAN, acknowledgement number, and assessment year.
Q15. If an assessee chooses to e-Verify later, what options are available for e-Verification?
The assessee can e-Verify the ITR later by using all the options of e-Verification except Digital Signature Certificate (DSC). Assessee can e-Verify the ITR through DSC only if he chooses to do the same immediately, that is, at the time of filing the ITR and not later.
Q16. Is it mandatory to verify ITR?
Yes, ITR verification is mandatory to complete the return filing process. Without verification, your ITR submission will remain incomplete and will not be processed by the Income Tax Department.
Q17. How can I e-Verify my ITR using Aadhaar OTP?
You can e-verify your ITR using Aadhaar OTP by following these steps:
Ensure your Aadhaar is linked with your PAN and your mobile number is registered with Aadhaar.
Log in to the Income Tax e-filing portal, select the ‘e-Verify Return’ option.
Choose the Aadhaar OTP option and an OTP will be sent to your registered mobile number.
Enter the OTP in the provided field and click ‘Validate’ to complete the verification.
Q18. What if I miss the 30-day deadline to verify my ITR?
If you fail to verify your ITR within 30 days, it will be considered as an unfiled return. However, you can file a Condonation of Delay request to the Income Tax Department by providing a valid reason for the delay. Once approved, you can proceed with the e-verification.
Q19. What happens if my ITR-V is rejected?
If your ITR-V is rejected, you will be notified by the Income Tax Department, along with the reason for rejection. Common reasons include incorrect details, submitting after the 30-day deadline, or physical issues (like folded or stapled documents). You can correct the error and resend the ITR-V within the allowed time frame.
Q20. How can I track if my ITR has been verified successfully?
After successful e-verification, you will receive a confirmation email and SMS from the Income Tax Department. Additionally, a success message and transaction ID will be displayed on the e-filing portal. You can also check the status under the ‘My Account’ section on the portal.
Q21. Can I verify someone else’s ITR as an Authorized Signatory or Representative Assessee?
Yes, an Authorized Signatory or Representative Assessee can e-verify the return on behalf of the assessee. The verification can be done through Aadhaar OTP, EVC (Electronic Verification Code) generated through bank or demat accounts, or net banking.
Q22. Can I still e-verify my return without logging into the Income Tax Portal?
Yes, you can e-verify without logging into the Income Tax portal by using the ‘Quick Links’ option on the e-filing website. You will need to provide details like PAN, acknowledgment number, and assessment year to proceed with the e-verification.
Q23. Is it necessary to send a physical ITR-V if I choose to e-Verify my return?
No, if you opt for e-verification of your ITR, there is no need to send a physical ITR-V to CPC, Bengaluru. E-verification completes the process instantly.
Q24. What if my mobile number is not linked to Aadhaar? Can I still e-verify my return?
No, you will not be able to e-verify using Aadhaar OTP if your mobile number is not linked with Aadhaar. You need to update your mobile number with Aadhaar to proceed.
Q25. Can I e-Verify my ITR using an inactive bank or demat account?
No, only active bank or demat accounts that are pre-validated and EVC-enabled on the e-filing portal can be used for ITR e-verification.
Q26. What is Electronic Verification Code (EVC) and how long is it valid?
An EVC is a 10-digit alphanumeric code generated to verify your ITR. It is valid for 72 hours from the time of generation and can be used for e-verification through bank accounts, demat accounts, or net banking.
Q27. What happens if ITR-V is not received by CPC, Bengaluru, even after sending it on time?
If you have sent your ITR-V but received a notice that CPC, Bengaluru has not received it, you can resend the ITR-V. If the 30-day period has elapsed, you will need to submit a Condonation of Delay request before resending the document.
Q28. Can I use Digital Signature Certificate (DSC) for later e-verification?
No, DSC can only be used for immediate e-verification at the time of filing the ITR. It cannot be used later.
Q29. What happens if I don’t verify my ITR at all?
If you do not verify your ITR within the stipulated time, it will be treated as an invalid return, meaning it will be considered as if you haven’t filed the ITR at all. This could result in penalties or notices from the Income Tax Department.


Comments